Items used
Gauge Cluster bulbs25 watt electronics soldering iron soldering wick
panel removal tool
If you are having gauge issues you can find instruction and a video at Stepper motor replacement for GM vehicles. Click on photos for larger version.  GM Dash with burnt out cluster lightsHere we have a 2003 Silverado that has two burned out bulbs. If you take you vehicle to the shop they will tell you that you will have to replace the whole cluster to fix the issue. $500 - $600 or even more has been reported as charges to replace the instrument cluster in Chevrolet, Cadillac, Buick, GMC and Pontiac vehicles. I will show you how to replace the cluster gauge bulbs yourself and save money. Set the parking brake and turn the key to the run position. Do not start the vehicle. Move the gear shifter to Low which will give you more room to remove the bezel and instrument cluster. Use the panel removal tool to pry the bezel surrounding the gauge cluster and radio loose. You might be able to get your fingers behind the bottom right corner and pull it loose without the tool. Pry the bezel loose all the way around the edges and remove it. Be careful not to apply too much pressure and break the surround.
 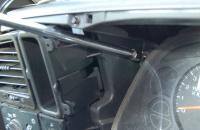 Remove screws with socket or nutdriver. You will then be able to see that there are four screws that hold the cluster into the dash. Some clusters have only tabs and clips. Use a 7mm socket or nut driver to remove the screws from the dash. Set them aside for later. You can then twist the instrument cluster around so you can access the wiring harness plug.
 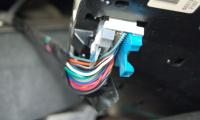 Instrument cluster connector Once you have it rotated you can shift the vehicle back into park and turn the ignition off. If you want to be extra careful you can remove the negative cable from the battery. You have to squeeze the two parts of the plug together to release the clip that holds the connector into the cluster. Once you have the connector clip released you can then pull the plug out of the cluster. Then you can remove the cluster from the vehicle. You can drive the vehicle without the cluster if you need. Just remember you won't be able to know how fast you are going. Take the cluster to a flat work area. If you are working on you kitchen table you may want to cover it to avoid getting solder on it. Use a screw driver or your fingers to unclip the fasteners holding the front cover of the instrument panel on.
 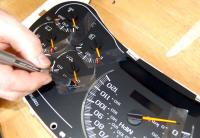 Mark dials with tape.Once they are all loose you can set the front panel aside. While it is off it is a good time to give the front a good cleaning. Set the panel down on the back so that the dials and faces of the gauges are up. Rotate all of the gauges counter-clockwise until they stop. Don't force them past where you feel tension or you will mess up the current calibration.
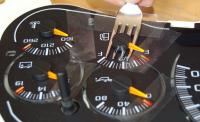 Remove dial pointers This will establish the location of where the dials should all be pointed when you finish replacing the stepper motors. Use a piece of Scotch tape or painters tape to mark the location of the dial pointer for each gauge. Place a piece of tape on the back of a fork and use it to pry the indicators off of the shafts. They may stick a little but they will come off. Unclip the fasteners holding the back panel and then you will have access to the circuit board.
 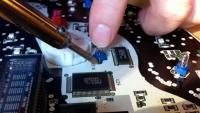 Remove bad bulbs: You can easily remove the old bulbs by desoldering them.With a soldering iron touch the two leads on the bulbs and they will come loose. You may have to pull up on them slightly while melting the solder. Unwrap the wire leads from the old bulb and straighten them out so that you can use them as a template on how long to cut the leads on the new bulbs. Place the new bulbs back into the holder and wrap the wires back around to the bottom making sure they don't touch.
 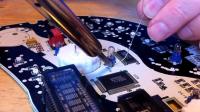 Solder the new bulb to the circuit board.: You can them solder the assembly to the circuit board. Make sure the wires for each bulb are on the same terminals as the old bulbs were on since each location has four terminals. You can put the back cover on and put the dash in your vehicle to see if all of the lights are working. If it is daytime you will have to remove the plastic cover from the front that has the markings for the gauges on it. If all of the lights are working during this test then you are ready to reassemble the unit.
  Testing bulbs in car.If you are having problem with the speedometer, tach or any other gauges then you will want to replace them while you have it apart before putting everything back together. You can find instruction and a video at Stepper motor replacement for GM vehicles.
 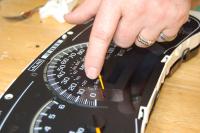 Realign dialsYou can now replace the back panel and turn the instrument cluster over with the face up. Push the dials back on with them pointing to the noon position. Rotate them to the left and try and line them up with the marks you made on the tape. If they won't go far enough left to line up with the marks push on them slightly so that they rotate on the shaft until they do line up. If they go too far left rotate them clockwise and turn the dial on the shaft. Then rotate to the left to see if it will line up. Repeat as needed. This step is easier to see in the video above.
 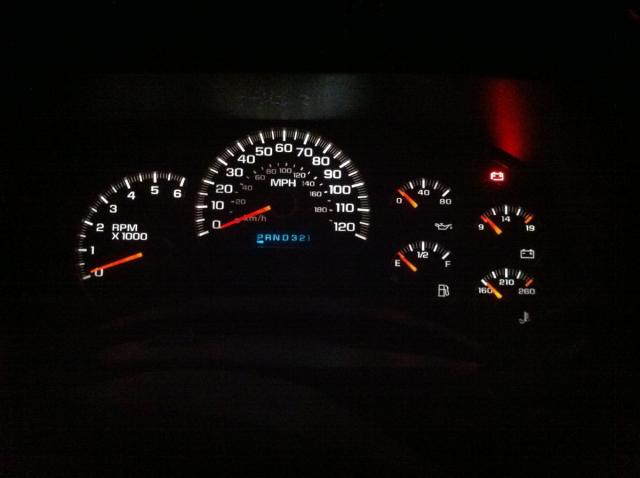 Bulbs now all working.Once all of the dials are in their correct positions make sure they are all seated and remove the tape. You can then snap the front cover back on and you are ready to reinstall the instrument cluster back into the vehicle. Plug the connector back in making sure it is seated and the retaining locks are activated. You can then set the parking brake, turn the ignition to run and shift into low gear. Twist the cluster back into position and put the four screws back in that you removed earlier. You can now reinstall the bezel.
Items used
Gauge Cluster bulbs25 watt electronics soldering iron soldering wick
panel removal tool